
How to Pack Kitchen for Moving
The kitchen usually looks manageable until you start packing it. Then the counters fill with open pantry bags, a damp blender, sharp knives, glasses that won't nest safely, and the coffee maker you still need in the morning. Unlike other rooms, the kitchen asks you to handle food, liquids, sharp metal, fragile glass, and bulky appliances at the same time, and each needs a different plan.
The practical answer is to stage the work. Decide what's worth moving first, pack items according to how soon you'll need them, and keep heavy or leak-prone boxes away from fragile pieces. A little order now makes moving day safer and unpacking far less frustrating.
Table of Contents
Your Two-Week Kitchen Packing Timeline - Start with the shelves, not the boxes - Finish the work in the final week
Decide What Stays, Donates, or Gets Tossed - Make a decision shelf by shelf
Wrap Dishes and Glassware So Nothing Rattles - Build the carton from the bottom up - Test for movement before sealing
Pack Small and Large Appliances the Right Way - Use the same packing script for each appliance - Keep the moving crew out of guesswork
Handle Knives, Sharp Tools, and Liquids Safely - Secure sharp edges before boxing - Keep liquids upright and contained
Self-Pack the Whole Kitchen or Hire Help for the Fragile Bits - Pay for the work you actually need
Label, Load, and Unpack Without Losing Your Mind - Close out the move in three passes - Reuse what stayed clean and dry
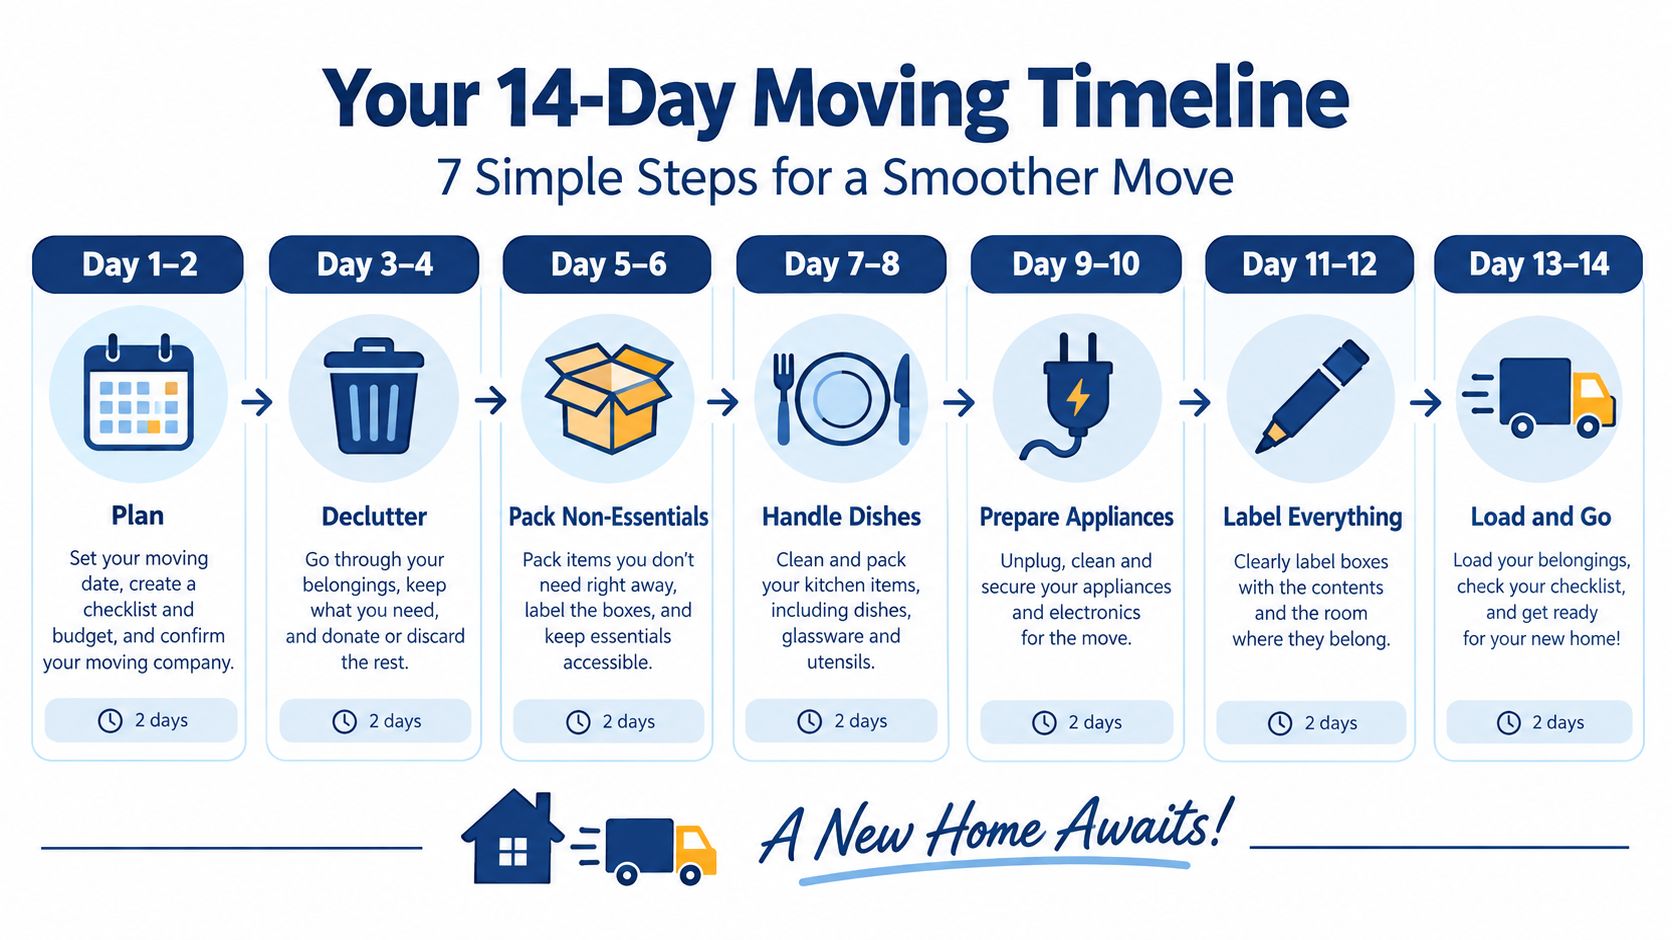
Your Two-Week Kitchen Packing Timeline
A kitchen goes sideways when every decision gets pushed into the final rush. Start with food and rarely used items, then work toward the things you rely on each day. If your schedule is already crowded, this guide on when to start packing for a move can help you coordinate the kitchen with the rest of the home.
Start with the shelves, not the boxes
Day one: Audit the pantry, fridge, and freezer. Sort food into what you'll use, donate where accepted, and discard. Seeing what you have makes meal planning easier and prevents you from buying duplicates while the move approaches.
By day three: Pack serving platters, specialty bakeware, seldom-used gadgets, and seasonal items. Keep a small “use this week” group accessible rather than opening and resealing boxes for things you still need.
During the first week: Box extra mugs, spare glasses, and duplicate utensils. Pack the kitchen's least-used cupboards first, leaving everyday dishes and cookware in place.
Finish the work in the final week
In the final week: Pack most dishes, glasses, and cookware, keeping only a small working set out. Choose sturdy cartons, pack similar items together, and label each box as you close it. Uniform, clearly marked boxes are easier for the crew to sort and load than a last-minute mix of open cartons.
On moving morning: Pack the last knives, remaining liquids, and essentials after you've used them. Keep a simple open-first kit aside with a mug, a plate, basic utensils, and whatever you'll need for the first meal or coffee at the new place.
Put this checklist on the fridge so everyone knows what stays available:
Early stage: Pantry and freezer audited, donation items separated.
Middle stage: Servingware and rarely used appliances boxed.
Final week: Most dishes and cookware packed, daily set still accessible.
Moving morning: Knives, remaining liquids, and essentials packed last.
Decide What Stays, Donates, or Gets Tossed
The cheapest box is the one you don't have to pack. Before buying supplies, clear the shelves and make four piles: expired or damaged food, chipped or mismatched dishware, unused duplicates, and unopened shelf-stable items that may be suitable for donation. Don't spend time wrapping something you already know you don't want in the next kitchen.
Food deserves a deliberate audit. The EPA estimates that the average consumer discarded about $728 of uneaten food in 2023, or roughly $14 per week. For a household of four, the estimate is approximately $2,913 annually, or $56 per week. Those figures make a pantry check more than a tidy-up. The EPA's food-waste report offers a useful reason to use or donate food before it becomes a box you carry and then throw away.
Make a decision shelf by shelf
Expired food, leaking containers, and anything damaged go straight into disposal, following local requirements where relevant. Unopened canned goods, dry staples, and sealed spices may be donated if a local food pantry accepts them. Call or check its current donation rules before packing; acceptance varies.
For dishes, ask whether you'd choose the item again for the new kitchen. A chipped mug, a stack of mismatched plates you never reach for, or a warped baking sheet adds weight without earning cupboard space. Use the same test for duplicate appliances: if one works and the spare has been gathering dust, leaving the spare behind is usually easier than finding room for it.
Practical rule: If you wouldn't unpack it first in the new home, think twice before paying to pack and move it.
Keep the audit brisk. Give each shelf a clear decision, set donation items aside for a prompt drop-off, and don't turn the sorting into a weekend-long debate about every spatula. By the time the packing cartons arrive, the kitchen should contain only the food and equipment you've chosen to keep.
Wrap Dishes and Glassware So Nothing Rattles
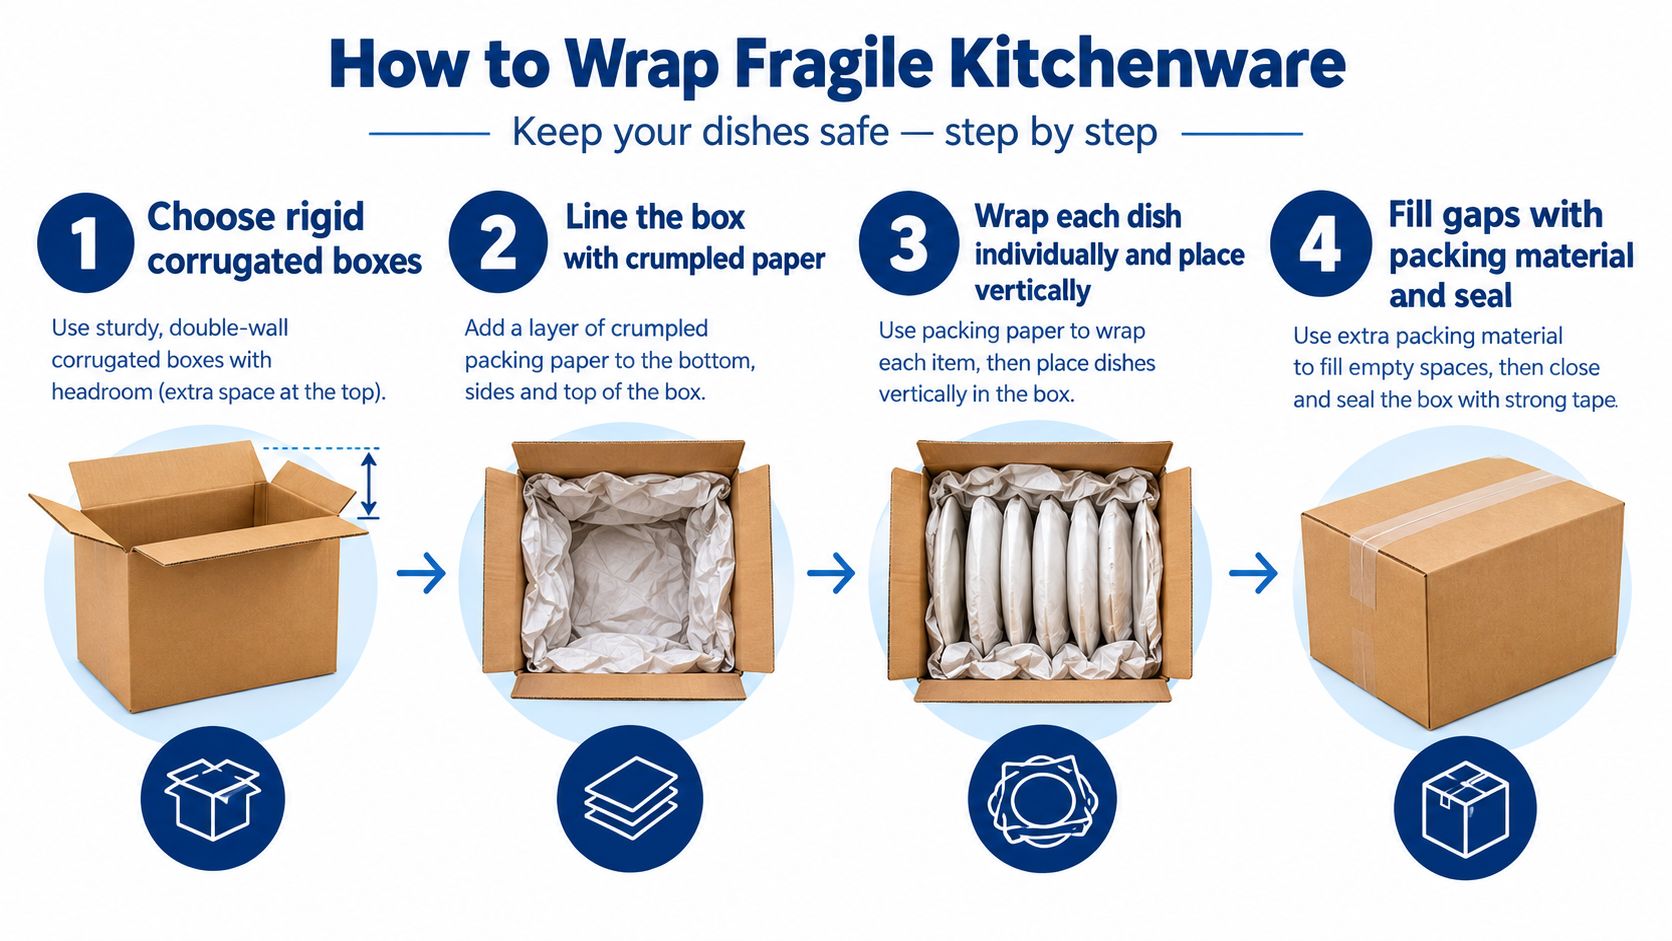
A fragile box fails when its contents shift, collide, or press against the walls. A rigid corrugated-fiberboard box with room for cushioning gives you a better starting point than a carton packed tight to its flaps. For help estimating supplies before you begin, use this guide to how many moving boxes you may need.
Build the carton from the bottom up
Cushion the base with crumpled packing paper or foam. Wrap each dish and glass individually, then place heavier, more resistant pieces at the bottom and lighter ones above. Add paper or foam between every item, and fill the side gaps so nothing can touch the box walls.
Plates can be placed vertically, with padding between them, while stemware and thin glasses need extra care around delicate rims and stems. Keep similarly shaped items together when it helps them sit securely, but don't force a stack or nest that presses one piece against another. For an especially delicate or valuable glass, china, or serving piece, double-boxing adds another cushioned boundary. It's an option for the pieces you most want to protect, not a requirement for every carton.
Leave room for a top cushioning layer. If the flaps press directly onto a glass or plate, rearrange the contents instead of forcing the box shut.
Test for movement before sealing
Close the flaps loosely and gently shake the carton. If you hear or feel movement, add more filler. USPS guidance calls for cushioning around items and recommends this check before sealing; its package-preparation guidance also describes using pressure-sensitive tape to secure package seams.
Use approximately 2-inch-wide packing tape, sealing the center seam and edges in an H-pattern. Then mark the room, contents, orientation, and a clear “FRAGILE, KITCHEN” note. Labels help the people carrying the box, but they can't stop dishes from breaking if the contents rattle.
Keep cast-iron pans, canned goods, bottles, and other dense items out of glassware cartons. Combining them to save space feels efficient, but it puts weight and shifting pressure beside pieces that need stable, cushioned support.
Pack Small and Large Appliances the Right Way
Appliances are awkward because they combine weight, moving parts, cords, and sometimes liquid residue. Treat each as its own package rather than filling its bowl, basket, or chamber with loose kitchen items. Nesting objects inside an appliance may save space, but it can also scratch surfaces or leave parts bouncing around in transit.
Use the same packing script for each appliance
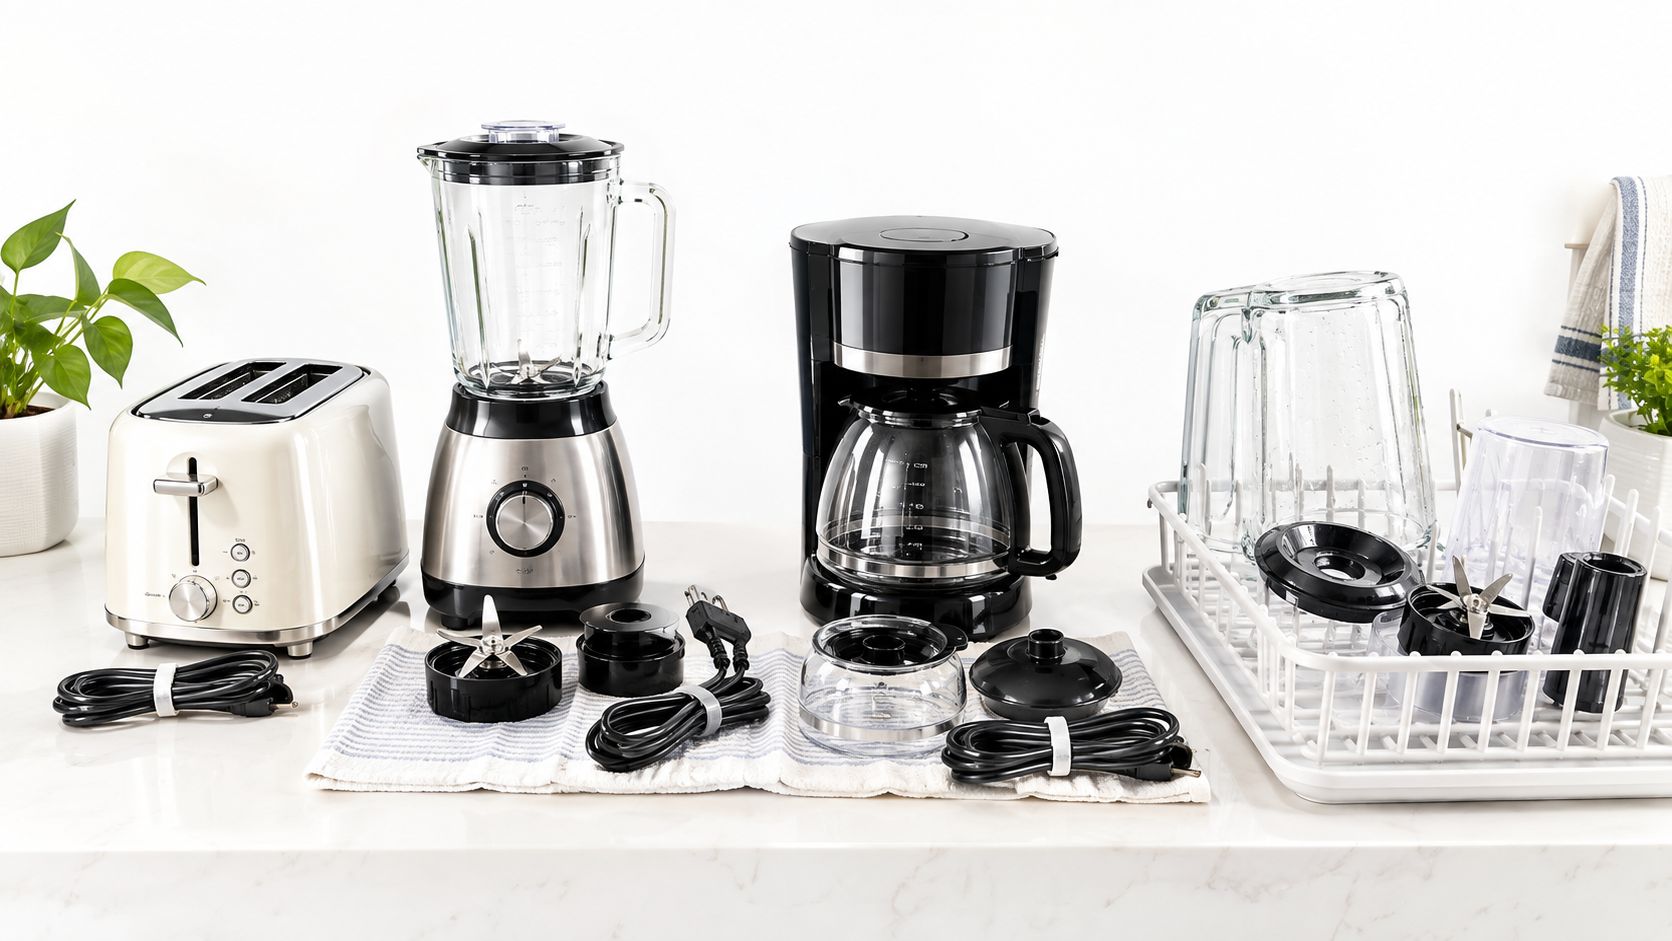
Start by emptying, cleaning, and drying the appliance completely. Drain removable reservoirs and let damp parts air-dry before packing. Remove detachable components, wrap them separately, and place them in a labeled bag taped to the appliance or secured inside the same carton. Wrap cords so they don't drag or scratch the finish.
A blender, stand mixer, or food processor needs special attention because a heavy motor may sit alongside a glass bowl, blade, or other delicate part. Protect fragile attachments separately and pad the appliance so it can't shift. For a coffee maker or air fryer, clear crumbs and residue, remove accessories where possible, and secure the cord in a bag.
Use the original carton and fitted foam if you still have them. Otherwise, choose a sturdy box that leaves room for cushioning without letting the appliance slide around. A snug dish pack can work for some larger countertop appliances, provided the item is supported and the carton is suitable for its weight.
Keep the moving crew out of guesswork
For microwaves, toaster ovens, and multicookers, pack detachable racks, trays, lids, and cords with clear labels so they're easy to reunite with the main appliance. Don't assume a loose accessory will stay inside an open cavity during handling.
USPS guidance allows suitable corrugated-fiberboard boxes up to 70 pounds when their construction and contents support that weight, but a household carton still needs to be safe to lift. USPS' packaging requirements describe packaging standards, including box construction and handling considerations. For home packing, keep dense items in smaller cartons and avoid making any appliance box so heavy that stairs or a tight turn become unsafe.
Handle Knives, Sharp Tools, and Liquids Safely
Knives and liquids shouldn't be treated as just another layer in a kitchen box. One can injure the person reaching inside; the other can soak cartons and damage what's packed nearby. Separate them, pack them deliberately, and make sure the first person handling each box can tell what's inside.
Secure sharp edges before boxing
Slide each knife into a commercial blade guard or a sheath made from corrugated cardboard. Wrap it firmly so the guard can't slip off, then place it in a small, sturdy carton with the sharp edge pointing away from the opening. That way, someone opening or reaching into the box encounters the handle first.
Use the same approach for peelers, skewers, and other sharp tools. Don't hide an uncovered blade in a bundle of utensils, and don't leave knives loose in a drawer that someone might carry without checking.
Keep liquids upright and contained
Tighten caps, place containers upright in leak-resistant bags, and add absorbent material around them. Keep liquids away from fragile dishes and never put them above glassware in the same box. Pack only what you intend to move, and consider whether an opened bottle is worth the risk and effort.
A lid that feels tight on the counter can still leak after a box shifts. Bag it before it goes into a carton.
Open cleaning chemicals, propane, and flammable aerosols shouldn't be packed casually with household goods. Check your mover's prohibited-items policy and the product label, then arrange safe disposal or another approved option before moving day. Don't pour chemicals down a drain or put hazardous containers in regular rubbish unless local guidance says that's permitted.
Self-Pack the Whole Kitchen or Hire Help for the Fragile Bits
The right packing choice depends on what's in your cupboards and how much time you have, not on a rule that every kitchen needs full-service packing. A small apartment with a few everyday dishes is a different job from a large home with a china cabinet, delicate stemware, and crowded cupboards. Compare the trade-offs before deciding.
Approach | Best For | Time Required | Breakage Risk | Approximate Cost |
|---|---|---|---|---|
Full DIY packing | People with time, manageable dish volume, and confidence packing fragile items | Highest homeowner effort | Lowest direct service cost; supplies still need to be purchased | |
Hybrid packing | Homeowners who can pack pantry goods and sturdy items but want help with dishes and glassware | Moderate homeowner effort | Lower for the fragile items handled by trained packers; other boxes remain the owner's responsibility | Middle ground, based on the work assigned |
Full-service packing | Larger kitchens, high volumes of breakables, or limited time | Least homeowner packing effort | Professional packing can reduce avoidable packing errors, though no method guarantees zero breakage | Highest service cost; depends on scope and materials |
Pay for the work you actually need
DIY works best when you can start early, have a clear place to pack, and are comfortable wrapping each item and checking cartons for movement. It's not automatically cheaper if a rushed job leads to breakage or leaves you packing into the night.
The hybrid route is often a sensible compromise. Pack pantry goods, plastic containers, utensils, and sturdy pots yourself, then hire help for crystal, china, or pieces with awkward shapes. Full-service packing buys speed and fewer household packing tasks in exchange for a higher bill. Ask what materials, labeling, and fragile-item handling are included so you're comparing the same scope.
Webster Moving Co. offers packing services and can assist with fragile household items as part of a move. If you're weighing that against packing yourself, this overview of packing and moving services can help you identify what to ask before choosing an arrangement.
Label, Load, and Unpack Without Losing Your Mind
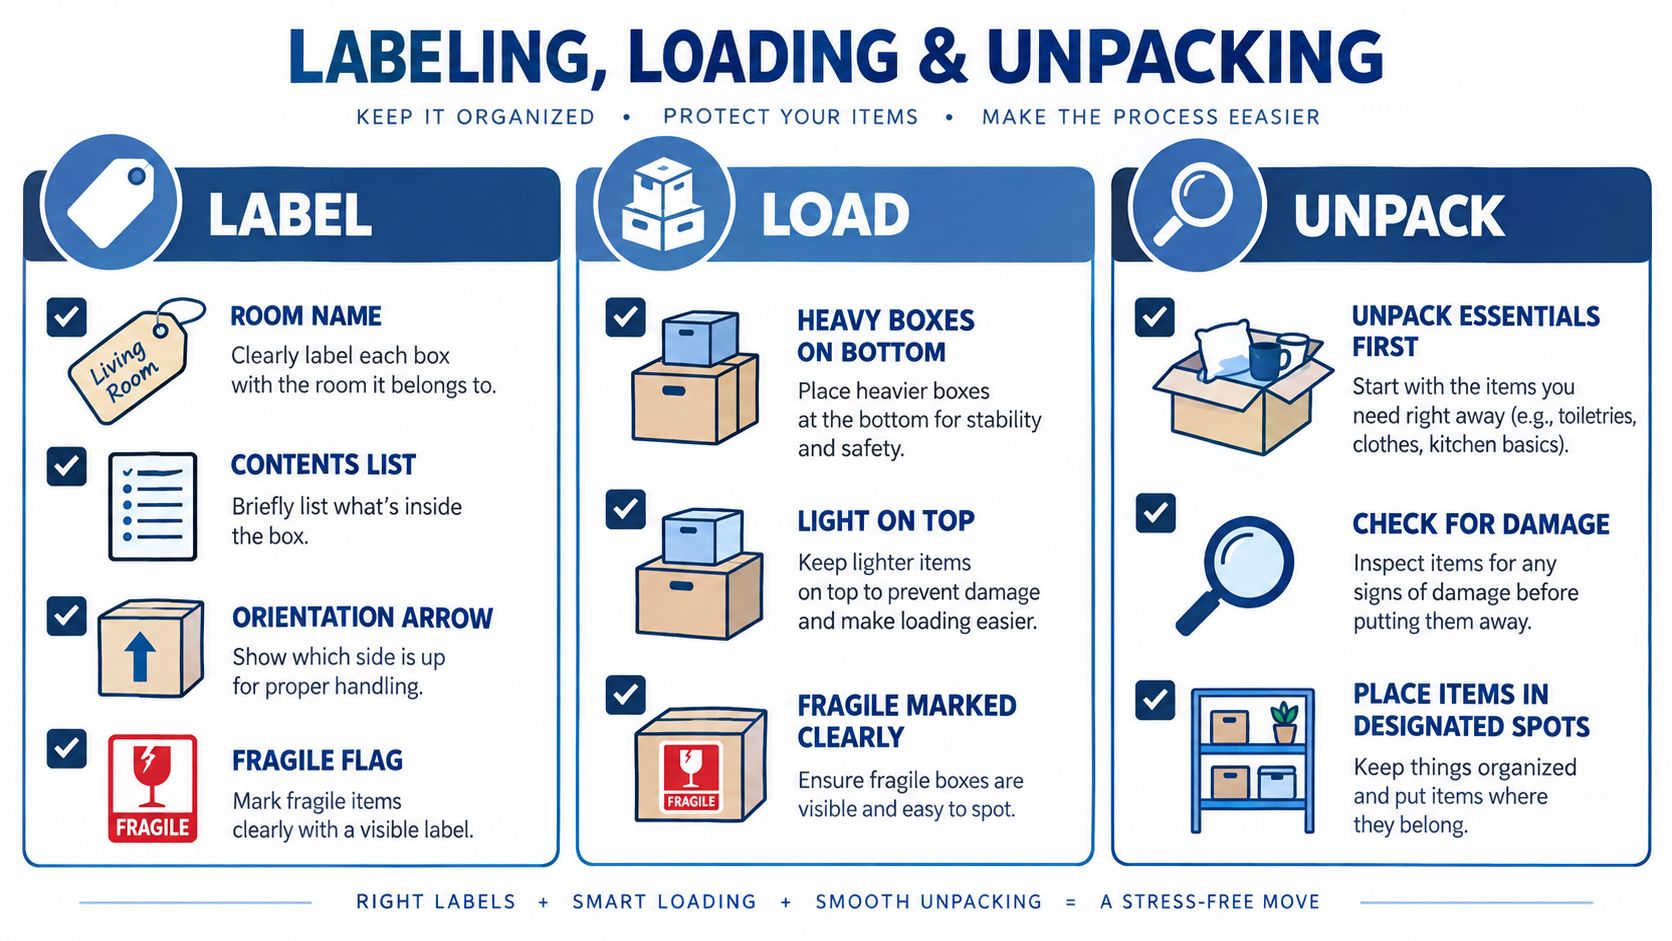
A sealed box is only useful if the movers know where it belongs and you can find what you need after arrival. Label each carton with the destination room, a concise contents list, and an orientation arrow where necessary. Add a fragile flag to boxes that need careful handling, and keep a simple inventory on your phone or a sheet of paper.
Close out the move in three passes
Label: Write the kitchen destination and contents on the carton, not just “kitchen.” “Mugs and coffee gear” is easier to find than “miscellaneous.” Keep the inventory brief enough to maintain as you pack.
Load: Set heavier cartons on the bottom and lighter ones above, with stacks stable and boxes secured. Keep liquid cartons upright and separate from fragile goods. Place fragile cartons where they won't be crushed or shifted by dense items.
Unpack: Check fragile cartons for damage before discarding their packing material. Set up the coffee station and one pot first, then unpack the items you need for the next meal. A functional morning makes the rest of the kitchen easier to sort.
Reuse what stayed clean and dry
Corrugated cardboard has a strong recycling record: EPA data report a 96.5% recycling rate for corrugated boxes in its materials figures, based on the cited reporting period. That rate is a reason to keep clean, dry cartons in good condition after the move and follow your local recycling rules. The EPA's containers and packaging data distinguishes corrugated boxes from the broader packaging waste stream.
Flatten clean cardboard for recycling or reuse. Separate boxes and paper contaminated with grease or food residue, along with plastic film, according to local guidance. Your close-out list is simple: label clearly, load with weight and fragility in mind, check for damage, set up the essentials, and sort the packing material.
Webster Moving Co. provides residential moving and packing services, including help preparing fragile household items for transport. If you're moving in Greater Austin or Central Texas and want a crew to handle some or all of the kitchen packing, visit Webster Moving Co. to request an estimate.
Comments