
How to Pack a POD: Load Order, Weight and Protection
The container is sitting in your driveway, the doors are open, and your house is half in boxes. That's the moment many people start carrying things out in whatever order they grab them. It's also how a load ends up overweight at one end, crushed in the middle, and missing the bedsheets on the first night. Knowing how to pack a POD isn't about filling a box. It's about planning a small warehouse you'll have to unload safely later.
Table of Contents
Choose a Container Size and Sketch the Layout - Measure Before You Sketch - Draw the Load on Paper
Heat and Humidity Items That Should Stay Out - The Dry Loading Rule - Days Versus Weeks
Organize Access Zones for Unloading Day - Map What You Load - Where Efficiency Turns Unsafe
Load and Secure the POD Layer by Layer - Steps 1 to 3 Inspect, Protect the Floor, Start at the Rear - Steps 4 to 6 Dense Cartons, Layers, and Padding - Step 7 Restrain in Every Direction - Fragile Goods Need Their Own Sequence - The Push Test and the Final Record
Choose a Container Size and Sketch the Layout
Choosing by bedroom count is the mistake behind most overloaded containers. Two homes with the same room count can hold very different amounts of furniture, books, and garage gear. What matters is cubic space, how your largest pieces fit together, and the total weight you're putting on the floor.
The PODS portable container sizes guide lists an 8-foot container at approximately 8 × 7 × 8 feet for homes or apartments of up to about 500 square feet, a 12-foot container at 12 × 8 × 8 feet for approximately 500 to 800 square feet, and a 16-foot container at 16 × 8 × 8 feet for about 1,200 square feet. Those are exterior dimensions, so usable interior space can vary slightly by model. The same progression corresponds to roughly 385 cubic feet for the 8-foot commercial model and 689 cubic feet for the 12-foot model, which shows why packing efficiency matters more than a room label.
Container | Exterior size (ft) | Typical home size | Maximum load |
|---|---|---|---|
8-foot | 8 × 7 × 8 | Up to about 500 sq ft | 5,200 lb |
12-foot | 12 × 8 × 8 | About 500 to 800 sq ft | 4,700 lb |
16-foot | 16 × 8 × 8 | About 1,200 sq ft | 4,200 lb |
Measure Before You Sketch
Measure the pieces that control the layout first. That means sofas, mattresses, dressers, dining tables, sectionals, and anything with an awkward depth. Write down length, width, and height, then flag what can't be disassembled, such as a solid armoire or a one-piece desk.
Don't guess at carton counts either. If you're still estimating boxes, work through how many moving boxes you need for each room before you reserve a size. Boxes are where cubic estimates double.
Draw the Load on Paper
Sketch the container as a simple rectangle. Mark the rear wall, the doors, and the centerline, then leave a clear path to the rear so the first pieces can go in without climbing over anything. Place the largest, non-disassemblable items on the sketch first and build around them.
Floor first: Put heavy furniture and dense boxes on the floor, with lighter cartons above.
Spread the weight: Distribute mass front to back and side to side instead of concentrating it in one corner.
Whole-load limit: Treat the maximum in the table as the limit for everything combined, not a limit per item.
If your sketch only works by stacking past the door line or leaning pieces at angles, you don't have a tight load. You have the wrong container size. Move up before loading day.
That last check saves the most grief. A container that's one size larger and loaded evenly will travel better than a smaller one forced shut.
Heat and Humidity Items That Should Stay Out
Tighter packing isn't always safer. A container can be weather-resistant without being climate-controlled, and sealing damp materials tightly together can hide moisture damage until you open the doors weeks later. In Central Texas, that's not a minor detail. You may load on a hot afternoon, store outdoors, and not see your things again for weeks.
PODS storage mistakes guidance warns that even one damp item can spread mold through a packed container, while cardboard can absorb moisture and trap it for weeks or months. It also identifies wax, electronics, instruments, antiques, photographs, artwork, medications, vinyl records, and some wood furniture as temperature and humidity sensitive belongings that require separate planning.
Item | Main risk | Where to keep it |
|---|---|---|
Wax candles and crayons | Softens and melts in heat | With you or climate-controlled storage |
Electronics and instruments | Humidity corrosion and heat damage | With you or climate-controlled storage |
Antiques and fine wood furniture | Warping, cracking and veneer lift | Climate-controlled storage |
Photographs and documents | Mold and warping | Sealed plastic bin, kept with you |
Artwork and framed prints | Humidity warping and glass damage | Climate-controlled storage |
Vinyl records | Warping in heat | With you or climate-controlled storage |
Medications | Heat degradation | With you |
Mattresses and upholstered furniture | Mold if loaded damp | Dry before loading, wrap in breathable covers |
Cardboard boxes | Absorb and hold moisture | Use sealed plastic bins for sensitive items |
The Dry Loading Rule
Load in dry weather and cooler hours when you can. Keep wet, freshly washed, or recently cleaned items out entirely, even if they feel dry on the surface. A rug cleaned the day before, a still-damp shower curtain, or towels from a last laundry load can humidify everything around them.
Desiccant packs have limits. They help inside a small sealed plastic bin, they need replacing, and they can't dry a wet load once the doors close. Don't use them as permission to load something damp.
Days Versus Weeks
For a load that'll sit only a few days, a sealed bin of sensitive items kept with you is usually enough. For several weeks of summer storage, move antiques, artwork, and records into climate-controlled storage instead. Check the container seal and interior dryness at the midpoint if access allows.
Decision rule: If a long afternoon in heat inside a metal box would damage it, keep it with you or climate-control it. Don't negotiate with that rule item by item.
Organize Access Zones for Unloading Day
Start with a different question. What do you need on the first night, before you've emptied half the container? If the answer is buried against the rear wall under a dresser, the most efficient load in the world has still failed you.
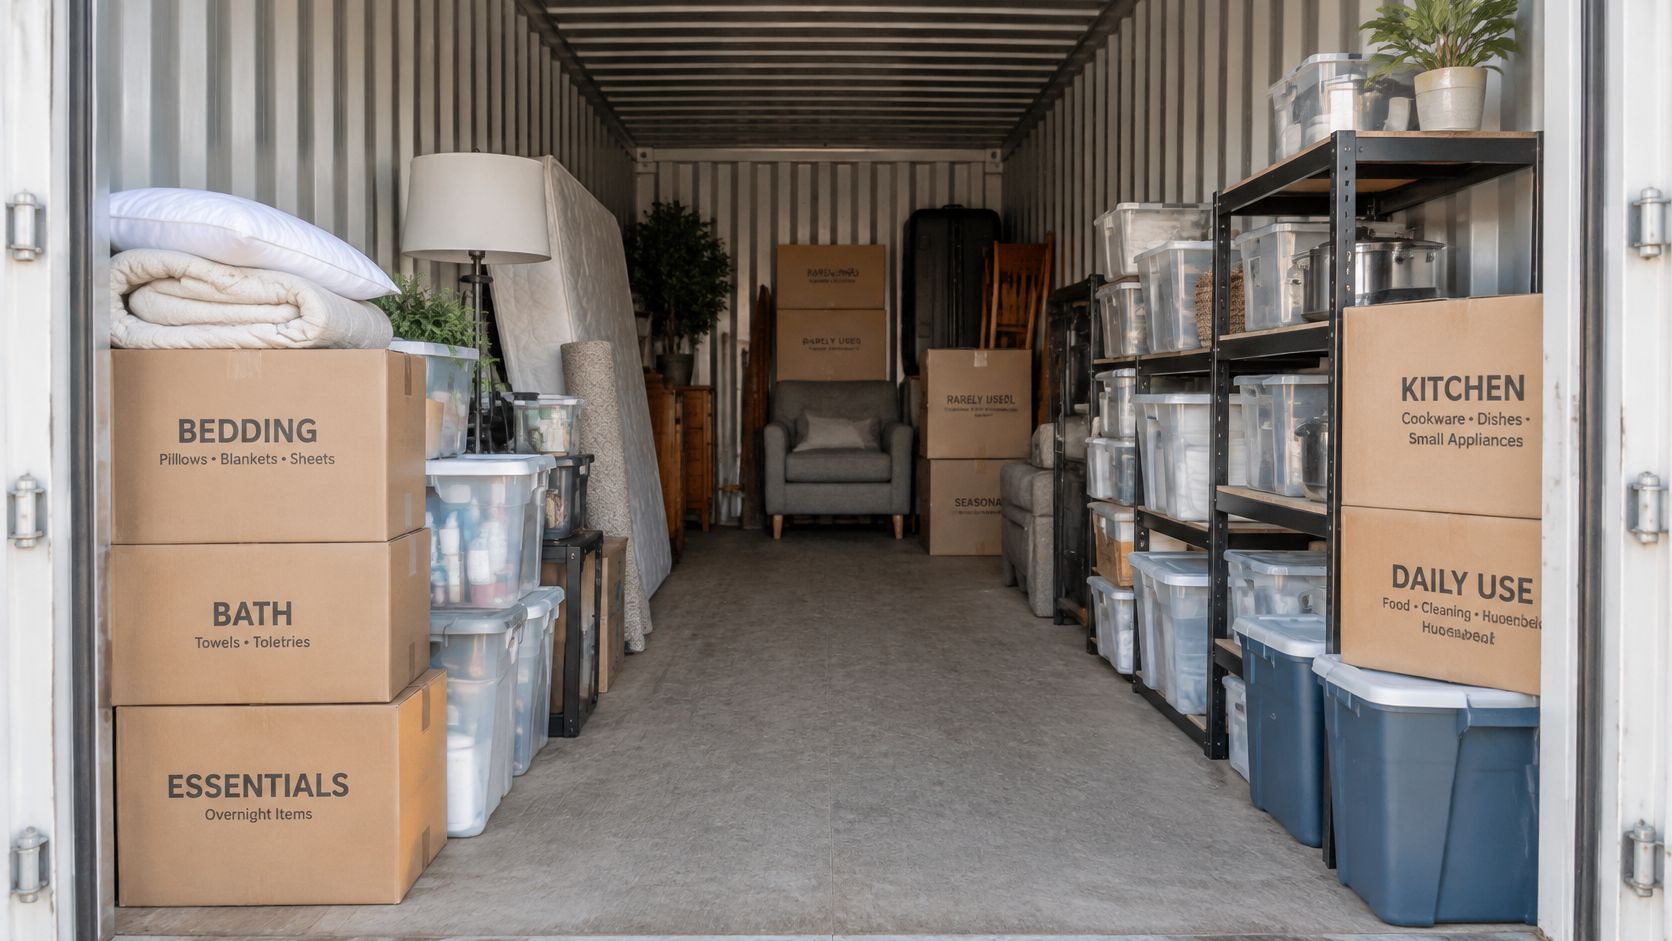
Treat the POD as a temporary warehouse with zones. The front zone near the doors is your access lane. Beds and bedding, toiletries, kitchen basics, chargers, work equipment, medications, and children's items belong there, clearly labeled, so they come off without a dig.
Map What You Load
Build a labeled inventory tied to container position, not just room names. Note rear, middle, or front, and left or right, beside each major item and carton group. A simple diagram on paper or your phone lets whoever unloads find a box without pulling apart a stable section.
Give awkward pieces their own plan before loading day. Safes and pianos need a flat, low base and a clear rolling path. Appliances need doors secured and space to tilt onto a dolly. Glass and oversized furniture need positions where they won't become the thing everyone has to squeeze past.
Do not bury: Anything needed in the first two days stays near the doors, never under a stack.
Flat and low: Safes, pianos, and washers sit on a level base where a dolly can reach them.
Upright and protected: Glass, mirrors, and framed pieces travel upright with edge protection, not flat under cartons.
Where Efficiency Turns Unsafe
The densest arrangement can be the hardest to unload without someone climbing, twisting, or pulling a heavy carton down from head height. PODS packing and loading tips list maximums of 5,200 pounds for an 8-foot container, 4,700 for 12 feet, and 4,200 for 16 feet, and advise that the heaviest items should not exceed 75% of the total allowed weight. Concentrated book, tool, and gym loads reach those limits faster than people expect.
Before you finalize zones, check the destination. Measure doorway widths, confirm stair or elevator access, and note where straps will release so an unloader isn't standing in the path of a shifting stack. If nobody can reach the rear without climbing over the load, redraw the zones.
Load and Secure the POD Layer by Layer
Load a POD as a restrained transport load, not as a spare room. A room doesn't brake, turn, vibrate, or sit tilted on a lift. Your container will do all of that, so every layer has to hold the layer around it.
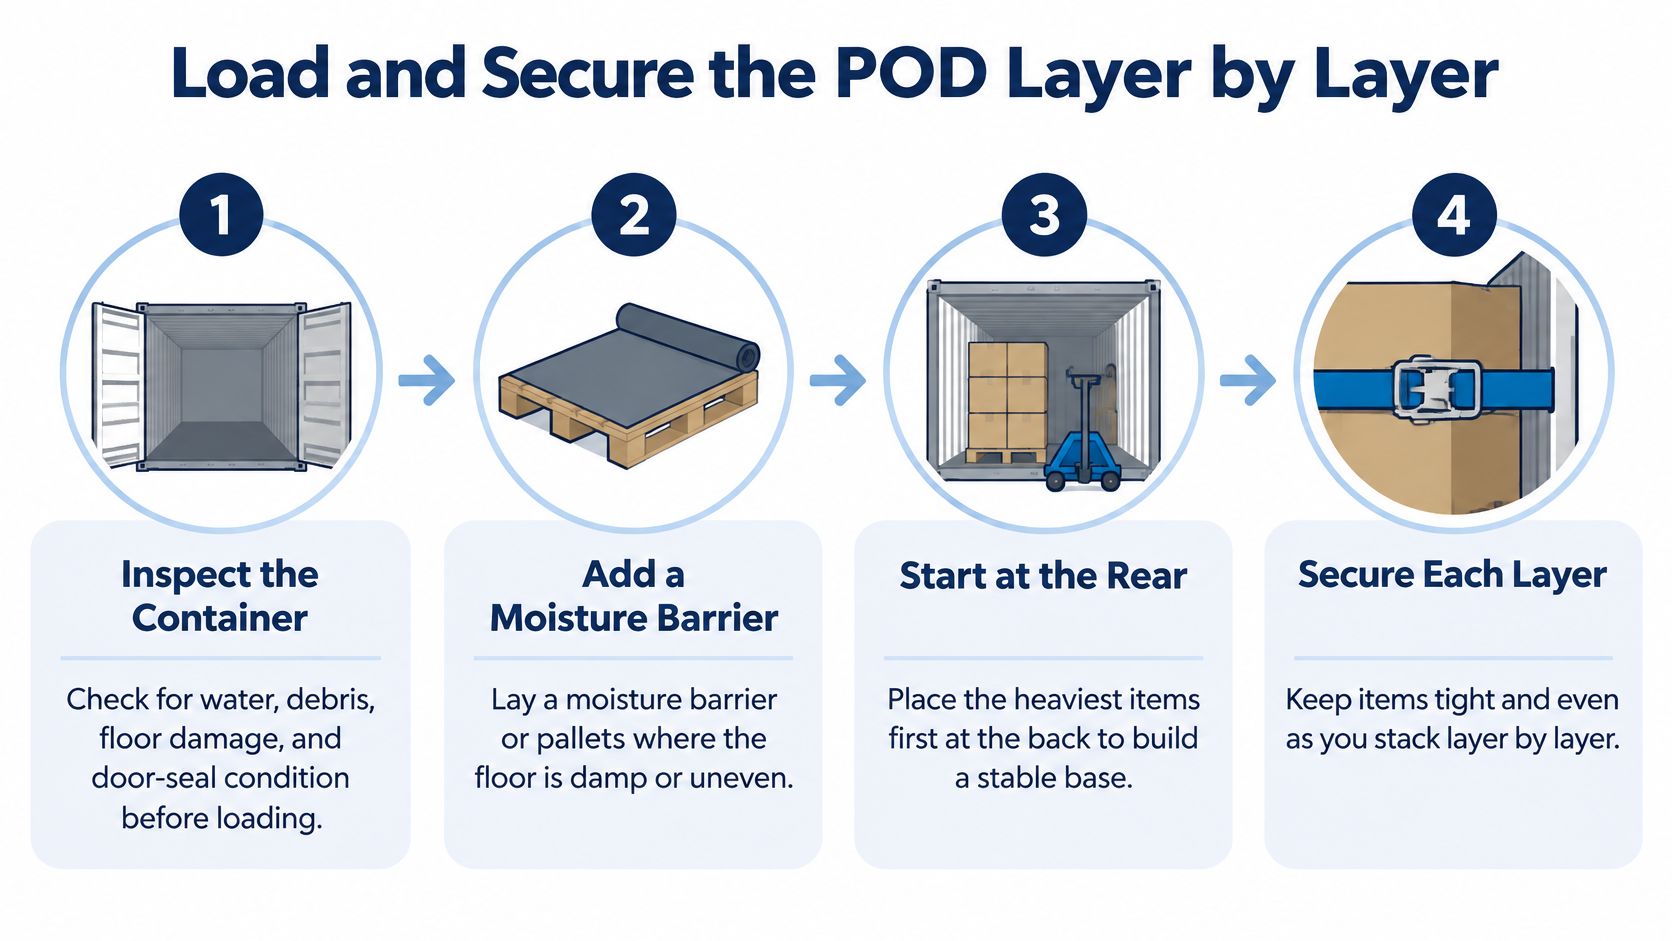
Steps 1 to 3 Inspect, Protect the Floor, Start at the Rear
Inspect before anything goes in. Check for water intrusion, debris, floor damage, and door seal condition. Run your hand along floor seams and look for daylight or soft spots. Loading over a wet or damaged floor locks in a problem you could've reported in two minutes.
Lay a moisture barrier or pallets where needed. Use them where the floor is damp, stained, or uneven, and under upholstered pieces and cartons you don't want sitting directly on the surface. Don't create a trip edge at the doors where you'll be rolling a dolly.
Start at the rear wall and build toward the doors. Place the largest furniture first and create a continuous wall of furniture and cartons. Keep heavy pieces low and toward the centerline, and spread weight across the full floor so no single end carries the mass.
That rear wall sets the geometry for everything else. If it's loose or uneven, every layer in front of it inherits the wobble. Take the extra few minutes to square it up.
Steps 4 to 6 Dense Cartons, Layers, and Padding
Put dense items in small cartons on the floor. Books, tools, files, and small appliances belong in small, tightly sealed boxes that two people can carry without straining. A large box of books is a classic false economy. It crushes at the corners, nobody can lift it safely, and it can't go anywhere except the floor.
Build in horizontal layers. Fill voids with pillows, linens, clothing, and other soft goods so each layer ends level. Aim for a slight compression fit where contents support each other and can't slide. A hollow, half empty top layer lets everything beneath it work loose.
Pad every hard contact point. Wrap furniture, pad corners and legs, and place moving blankets between hard surfaces. Don't stack cartons directly on upholstery or a polished tabletop. The weight may look harmless while you're standing there, but vibration turns small pressure points into dents, tears, and rubbed finishes.
The ASTM transport vibration testing standard identifies vibration, compression, shock, closure failure, and interior packaging interaction as principal distribution hazards. Vibration can loosen closures, shift contents, and fatigue packaging materials, which is why a load that feels snug in the driveway still needs real restraint.
One strap across an unstable stack isn't a restraint system. It's a decoration on a problem that will move as soon as the truck does.
Step 7 Restrain in Every Direction
Install load bars, ratchet straps, or braced plywood before closing. Every restraint should oppose forward, backward, and lateral movement. Strap across completed sections as you build, not only at the doors at the end, and use tie-down points where the container provides them. Keep the final door area limited to items that cannot fall against the doors when they're opened.
Check strap tension without crushing carton walls. A strap that's cutting into cardboard will loosen as the box deforms. Use blankets or corner protectors under straps on furniture so the restraint doesn't become the source of damage.
If the physical loading is the part you'd rather hand off, our loading and unloading service for POD containers covers how a crew handles the lifting and placement while you keep control of what goes where. Whoever loads it, the restraint rules stay the same.
Fragile Goods Need Their Own Sequence
Don't improvise fragile packing at the container door. Inventory and photograph high-value items first, and disassemble only where the manufacturer allows it. Bag hardware, label it by piece, and tape it to the item or keep it in your first-open zone.
Wrap glass and ceramics individually with cushioning, place them upright in double-wall cartons, and fill every void so pieces can't contact one another. Plates travel better on edge than stacked flat, and glasses need cells or enough padding that rims never touch. Mark cartons on multiple sides with room, orientation, and handling warnings, but treat labels as supplemental. A label doesn't stop a poorly packed box from failing.
For electronics, appliances, mirrors, and antiques, immobilize moving parts before wrapping. Secure appliance doors and loose shelves, remove or protect protruding knobs and handles, and use rigid edge protection on mirrors and framed pieces. Coil cables separately so they don't press into screens or finishes.
The ASTM vibration testing methods for shipping containers note that damage is especially associated with package and product resonances, and that transportation vibration can affect the container, closure, interior packaging, and contents. In plain terms, a fragile item that can rattle inside its own box will keep taking small hits for the entire trip.
The Push Test and the Final Record
Push each completed section firmly in several directions before you build in front of it. You're checking for visible movement, hollow rattling, bowing cartons, and pressure on fragile faces. Any one of those means repack now, while you can still reach it.
Movement: Add void fill or reposition the piece. Don't just strap harder.
Rattling: Open the carton and fix the interior packing. The sound is the contents hitting each other.
Bowing: The carton is overloaded or unsupported. Move weight down or split it.
Finish with a first-open zone near the doors holding tools, labels, blankets, cleaning supplies, and daily essentials. Keep hazardous materials, perishables, compressed gases, and leaking liquids out of the POD entirely. Record a final load map and the seal condition, with photos of each completed section, so the unloading crew can reverse your sequence without disturbing upper layers.
Confirm Your Load Plan and Book Early
Run the plan as a checklist before loading day, not while the container is half full. Confirm the size matches your home's square footage and your sketch of the largest pieces. Confirm total weight stays under the limit for that size, with the heaviest items under 75 percent of it, and confirm the floor barrier or pallets are ready to go down first.
Then confirm the details that get skipped under time pressure. Every carton is labeled on several sides, heat and humidity sensitive items are out, the access lane is marked on your diagram, and the load map is ready to record as you build. If you're still deciding between storage models, review how POD storage works from delivery to pickup before you commit to dates.
Size and sketch: Largest pieces measured, non-disassemblable items placed first on paper.
Weight: Dense cartons counted separately and spread across the floor.
Protection: Blankets, corner padding, straps, and load bars on hand before the first piece goes in.
Access: First-open items staged last, near the doors, and marked on the inventory.
Book as early as possible, particularly for weekends, the end of the month, and the busy summer moving season. We can often accommodate short-notice moves depending on crew availability, but early booking gives you real choice on timing and crew size. Bring your sketch and inventory when you request a quote, since that detail produces a far more accurate plan.
Save the checklist with your load map. Finally, measure the spot where the container will sit at your current home and at the destination, including overhead clearance and room for the delivery equipment. A perfect load plan still fails if the container can't be placed where you need it.
Webster Moving Co. loads and unloads POD containers across Central Texas, with crews sized to your home, your inventory, and any specialty pieces like pianos, safes, and large furniture. We offer free, no-obligation quotes through a short form, so send us your sketch and item list and we'll help you plan the load before the container arrives. Visit Webster Moving Co. to request your quote and lock in your loading date.
Comments