
How to Dismantle a Bed Without Damage or Lost Parts
You're staring at a bed that won't fit through the doorway, the lease ends tomorrow, and the bolts are already in a pile on the carpet. That's when most damage happens. How to dismantle a bed correctly isn't about speed, it's about keeping the frame stable while you work, keeping every fastener, and knowing when you shouldn't take it apart at all.
Table of Contents
Bed Types, Tools and Safety Setup
Identify your bed first, because the type decides what comes off first and where you'll get stuck.
Bed type | Typical parts | Common trouble spot |
|---|---|---|
Platform bed | Deck panels, side rails, headboard, footboard | Hidden bolts under the deck |
Slat bed | Wood slats, center rail, side rails | Non-identical slats going back in the wrong spot |
Metal frame | Rails or tubes, center support legs, gravity-lock brackets | Stuck gravity-lock joints |
Box spring foundation | Wood or metal box or grid, fabric cover | Heavy and awkward on stairs |
Your goal is a controlled disassembly that reduces the frame to manageable pieces while preserving fasteners and avoiding unstable loads. The CPSC product instability report recorded an estimated 28,300 people per year treated in U.S. emergency departments from 2015 through 2017 for tip-over injuries involving televisions, furniture, and appliances, with furniture-only incidents at 19,100 cases, or 68%. Those figures aren't bed-specific, but they're why you shouldn't lean a detached headboard against a wall and walk away.
Gather a Phillips and flat-head screwdriver, a socket set or ratchet, an Allen key set, a non-marring rubber mallet, painter's tape, zip-top bags, a marker, and your phone. Clear nightstands, lamps, and drawers, keep children and pets out, and walk the route to the exit before you loosen anything. If that route involves stairs or a tight elevator, check what's involved in apartment moves with difficult access before you commit to carrying a box spring yourself.
Check for Bed Bugs Before Moving Parts
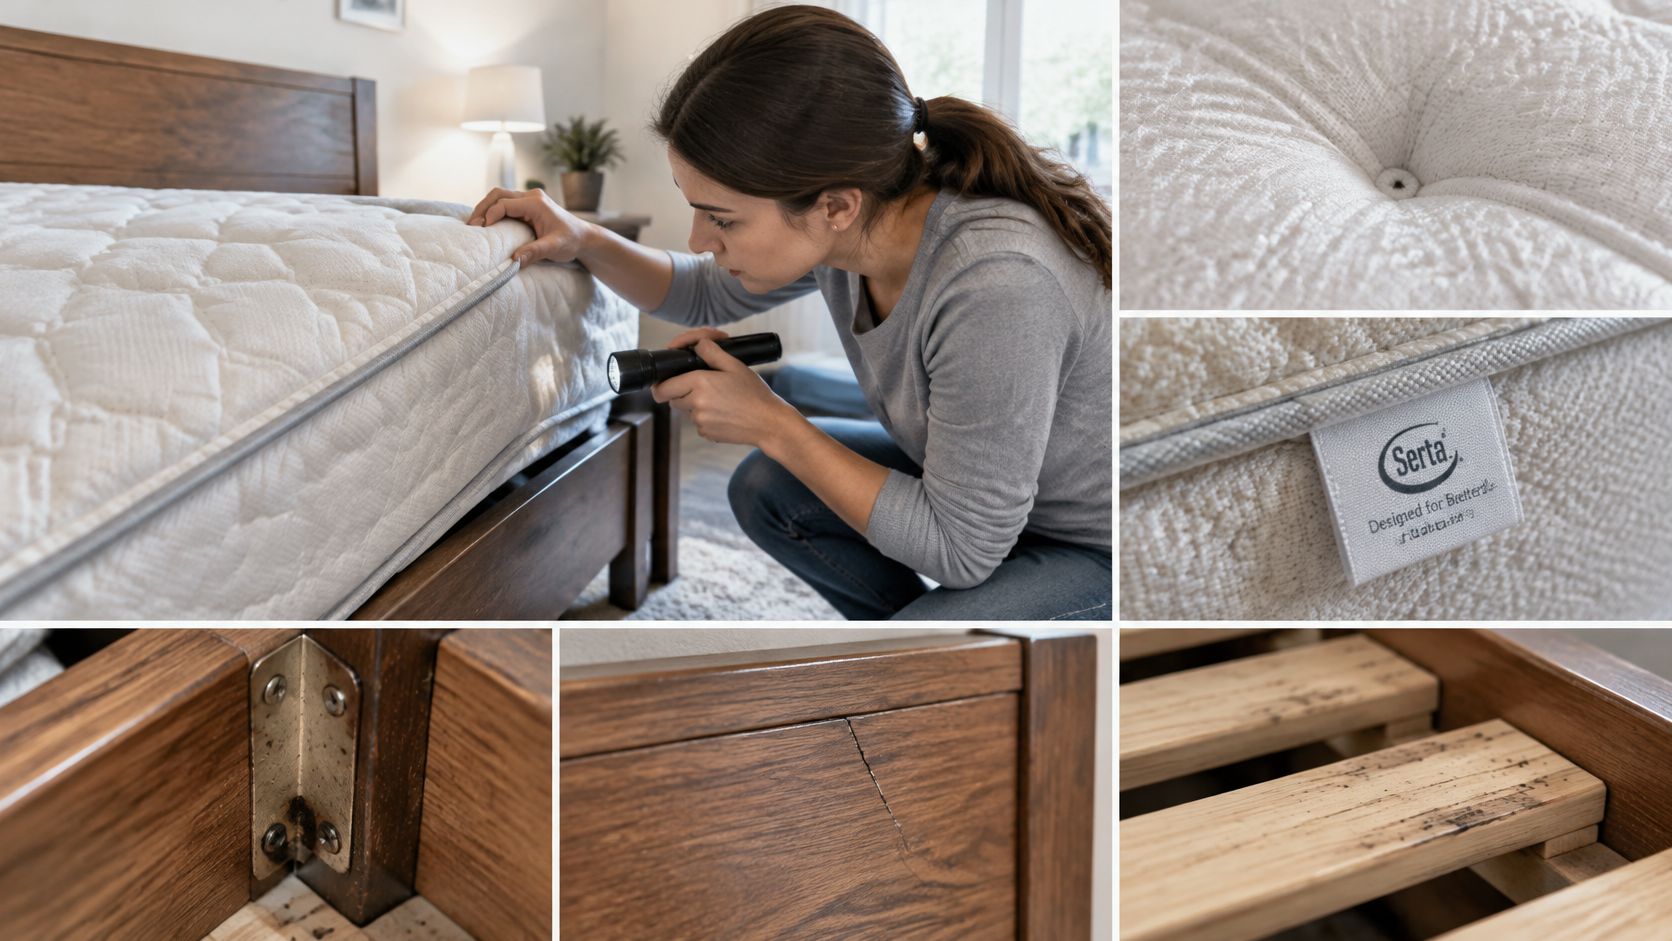
Taking a bed apart can make an infestation worse. When you open cracks, joints, and upholstery, you can spread bugs through your home, a shared hallway, an elevator, or a moving truck. I would inspect before I loosened a single bolt.
Check seams, tufts, the mattress tag, slat ends, and every joint in the headboard and frame with a flashlight. The U.S. Environmental Protection Agency bed bug guidance advises inspecting the bed, frame, and headboard for bugs, eggs, shed skins, and other evidence before moving them, and sealing items transported between rooms in plastic bags.
Use three clear decision levels
No evidence found: Bag the hardware, wrap the parts, and proceed normally.
Suspicious signs, no live bugs: Stop dismantling. Don't disturb the upholstery further, seal exposed parts in plastic, and call a licensed pest professional before anything goes on a truck.
Live bugs confirmed: Stop taking the frame apart. Don't load untreated parts into a truck, POD, or storage unit, and don't donate the furniture or leave it at the curb for someone else.
Practical rule: If you're not sure what you're looking at, treat the bed as suspicious until a professional tells you otherwise.
Potentially infested furniture should be emptied, treated, and sanitized before it enters a new residence. If you discard it, mark it or make it unusable so another household doesn't pick it up. For apartment moves in Central Texas, shared hallways and elevators mean one exposed headboard can become a building problem, not just your problem. If you've already started dismantling, pause and inspect the exposed joints and slats before you move another piece.
How to Take Apart a Bed Step by Step
Work in this order. Skipping ahead is how rails twist, center beams bend, and headboards tip.
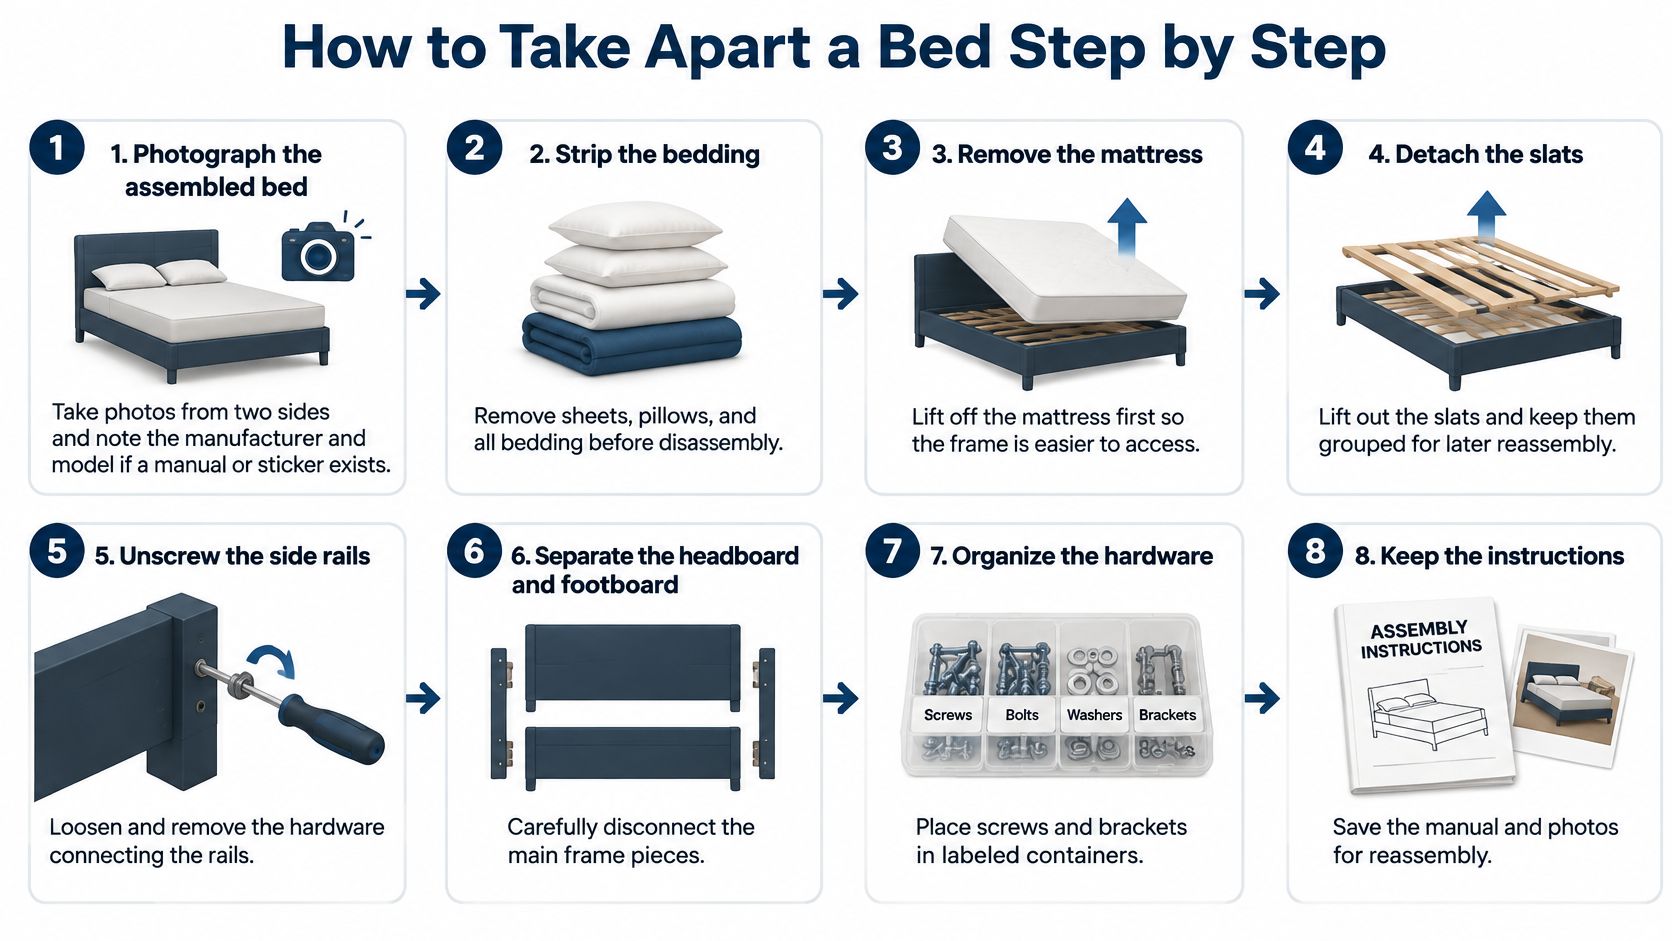
Photograph the assembled bed. Shoot it from two sides and take close-ups of every bracket. Note the manufacturer and model from a sticker or manual if you can find one.
Strip the bedding. Remove pillows, sheets, and protectors, then empty any under-bed drawers or storage compartments completely.
Remove the mattress and foundation. Lift with two people and set them flat, out of your work area. Don't drag a foundation on its edge down stairs, since that racks the grid inside.
Remove slats or the support deck. Lift loose slats out and keep them in order. If they're screwed down or not identical, mark each end with painter's tape noting its position.
Remove center support legs and the center rail. Do this before the perimeter comes loose, so the center beam never carries a load it wasn't designed for.
Detach the footboard. Have a second person hold it upright while you work, because the last bolt often carries the remaining weight.
Separate the side rails from the headboard. Your helper steadies the headboard so it can't tip when the rails release.
Bag hardware by group. Put bolts, washers, cam locks, and brackets in separate labeled bags and tape each bag to its component or to the headboard.
That sequence matches furniture disassembly guidance, which sets out removing slats before center supports, then the footboard, then the side rails from the headboard.
Loosen in stages, not one corner at a time
Back each bolt off a few turns as you move around the frame before fully removing any one bolt. This reduces twisting and binding, especially on wood frames that have settled over years. If you fully free one corner first, the frame racks and the remaining bolts fight you.
Don't force a joint that won't move. Stop, identify how it's connected, and then apply pressure in the direction it was designed to release.
For gravity-lock rails, lift straight up to clear the retaining lip. Pulling horizontally wedges the joint and bends the bracket. For a stuck friction joint, use a controlled twist or tap near the joint with a rubber mallet. Never pry against a finished face.
Carry long rails and the headboard with a helper, lifting rather than dragging to protect walls, flooring, and stair edges. Wrap sharp bracket edges in cardboard, separate finished surfaces with blankets, and finish with nothing loose on the floor for anyone to trip over.
Fixing Stuck Joints and Lost Hardware
Most damage happens when a joint resists and someone reaches for more force. Match the symptom first.
Symptom | Likely cause | Fix |
|---|---|---|
Gravity-lock rail will not release | Joint wedged by pulling sideways | Lift straight up past the retaining lip |
Friction joint stuck | Tight fit or swollen wood | Controlled twist or rubber mallet near the joint, never a pry bar on the face |
Bolt spins or strips | Cross-threaded or over-tightened earlier | Stop, do not force, and replace with a matching bolt |
Bracket bent | Prying or dragging the rail | Straighten by hand if uncracked; replace if cracked |
Hardware missing | Bags skipped or labels lost | Check the photo log, then order the exact replacement |
Slats mixed up | Pieces not marked | Match against the photos and mark each slat end with painter's tape |
A spinning bolt won't improve if you lean on the ratchet. You'll strip the insert, crush the surrounding wood, and turn a replaceable bolt into a frame repair. Stop, back it out if you can, and match the thread exactly at a hardware store or through the manufacturer.
A bent bracket is similar. If the metal isn't cracked, you can straighten it gently by hand or with pliers padded in tape. If it's cracked, replace it before reassembly, because that bracket carries the rail load every night.
If hardware is missing, check your photos and bag labels before you buy anything. People often tape a bag inside a rail and forget it. When you do need packing supplies for the rest of the room, working out how many moving boxes you need early keeps hardware bags from ending up buried in an unlabeled box.
Photograph any damage before you loosen anything further. That record shows a mover, manufacturer, or landlord exactly what condition the piece was in when you started.
Reassembling the Frame Without Wobble
Reassembly quality depends on alignment and controlled tightening, not force. Biltrite Furniture assembly guidance recommends rechecking and tightening bed bolts every 90 days, which is a useful benchmark after a move or after the frame settles.
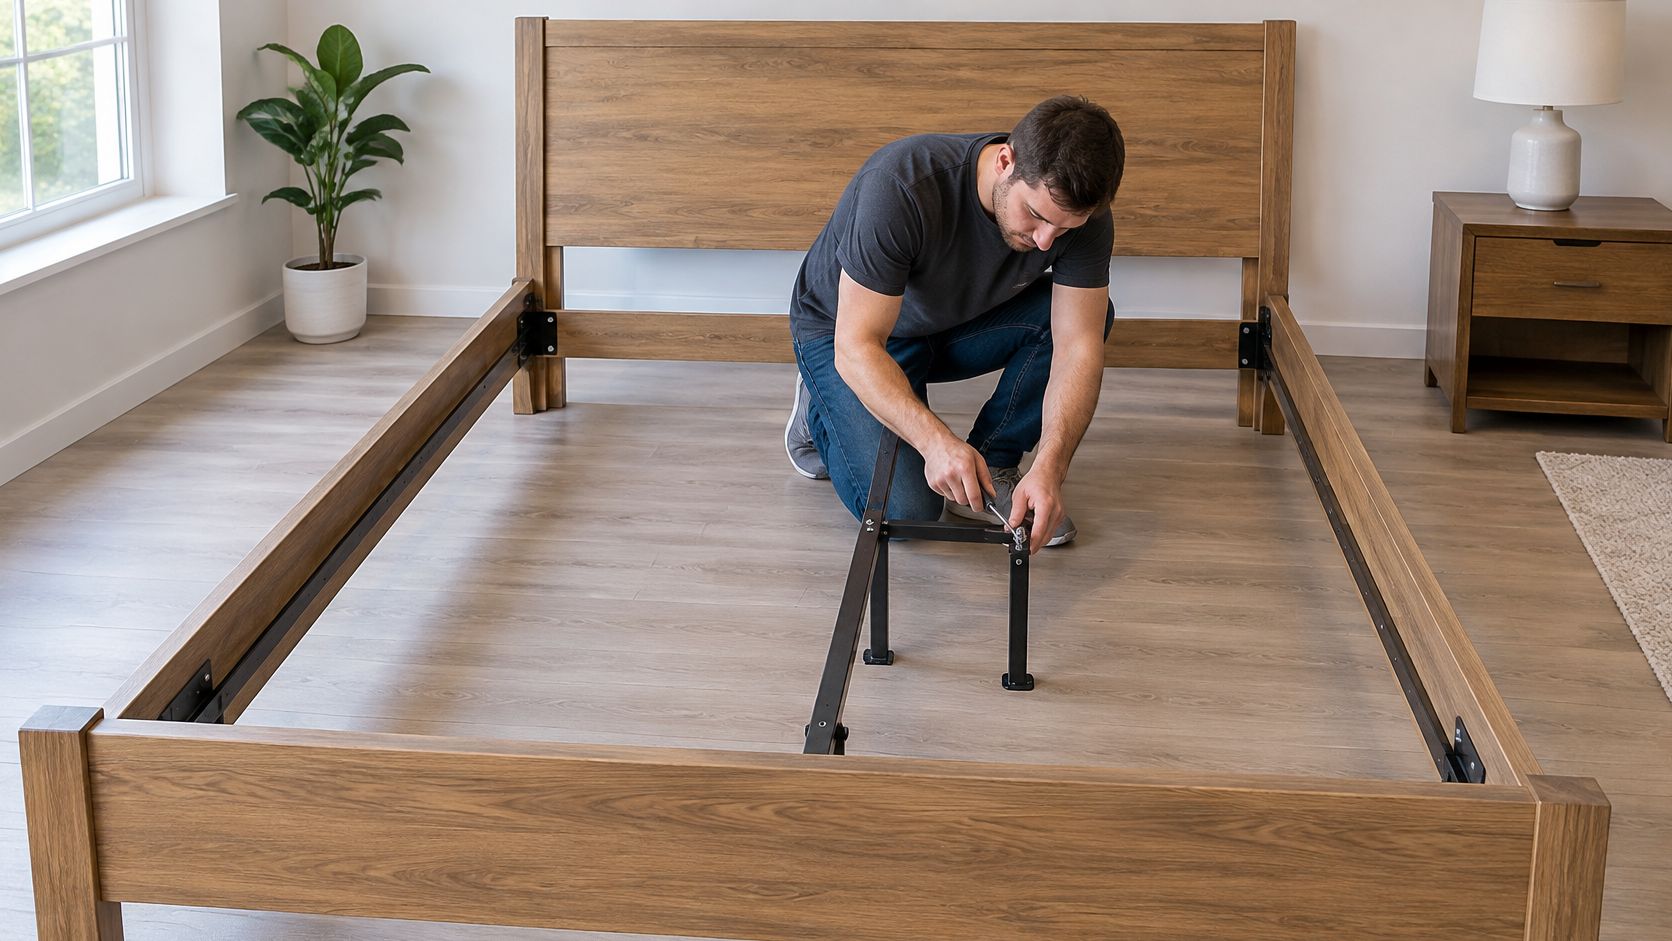
Lay the side rails parallel on a hard, level floor, not on carpet where you can't feel a rock.
Connect the headboard and footboard to the rails, leaving every bolt finger-tight.
Install the center support and its legs, then check that the perimeter is square and level.
Start every bolt by hand to avoid cross-threading. If a bolt won't turn easily, back it out and restart it.
Tighten in an alternating pattern. Move corner to corner in stages instead of fully tightening one corner first.
Add slats last, only after the frame is square, and confirm each slat is fully seated.
If a joint doesn't line up, loosen the adjacent connection, correct the geometry, and try again. Don't pull it into place with bolt tension. I would also skip the power driver unless your manual explicitly permits it, because excess torque strips fasteners, crushes wood fibers, deforms brackets, and damages veneer.
Before anyone sleeps on it, push on each corner. The frame shouldn't rock, lean, or creak under a firm shove. The mistakes that cause wobble are predictable: missing hardware, reversed left and right rails, omitted center legs, and slats in the wrong spacing or orientation. Compare each stage against your photo log and you'll catch most of them before the mattress goes back on.
Reuse, Recycle or Dispose of Old Parts
Dismantling doesn't automatically mean landfill. Decide part by part before you load anything.
Component | Usual best outcome | Check before transport |
|---|---|---|
Complete, clean frame | Donate or sell | Confirm no damage and no pests |
Wood slats and rails | Recycle or mulch where accepted | Separate from metal and remove all hardware |
Metal rails and brackets | Scrap metal recycling | Separate clean metal and protect sharp edges |
Mattress and box spring | Local bulky-item or special collection | Check local rules and any pest history |
Damaged or contaminated parts | Proper local disposal channel | Confirm acceptance before loading |
A complete, clean, undamaged frame is worth donating or selling, and keeping its bolts, brackets, and slats together makes that far easier for the next owner. Separated wood can have a recycling route, including shredding into landscaping mulch or use as alternative fuel where facilities accept it. Clean metal rails usually go to scrap recycling once you've removed fabric, wood, and plastic caps.
Two checks cause most delays. First, local acceptance rules vary by municipality, apartment complex, and transfer station, and a bed broken into pieces isn't always accepted in curbside trash. Confirm before you haul it. Second, pest status overrides everything else: contaminated parts shouldn't be donated, sold, or left for reuse.
Breaking a frame harder than necessary isn't the sustainable choice. Snapping rails to make them fit a dumpster destroys any chance of repair or reuse, while preserving standard rails and fasteners can extend the bed's life by years.
Decide Whether to Dismantle It Yourself or Hire Help
Dismantle it yourself when the bed is a simple platform or slat frame, you're on one level, there's no pest concern, and two capable adults can handle the headboard and mattress safely. That's a reasonable weekend job.
Hire help when the headboard is tall or upholstered, the box spring is heavy, the route includes stairs or a narrow elevator, parking is restricted, or you've found any sign of bed bugs. One person shouldn't attempt those beds, and forcing it usually costs more in wall and frame damage than the help would have.
We handle apartment moves with stairs, elevators, parking restrictions, and furniture disassembly and reassembly, so a bed can come apart and go back together as part of the move. If you're weighing that option, compare what's included in full-service moving against doing the bed, the carrying, and the rebuild yourself.
Before any crew arrives, tell them about stairs, elevators, loading areas, gate codes, and parking restrictions so they can plan the route. Make sure driveways, entrances, and elevators are accessible, and have someone over 18 present at pickup and delivery. Do three things this week: photograph the bed, write down your access details, and decide who is taking it apart.
If your bed is heavy, your stairs are tight, or your timeline is short, Webster Moving Co. can dismantle, move, and reassemble it as part of your residential or apartment move across Greater Austin and Central Texas. Request a no-obligation estimate, share your stair, elevator, and parking details, and we'll plan the route and crew so your bed arrives complete, with every bolt accounted for.
Comments